Tuesday 28 October 2014

Zombie Inspired Halloween Makeup

Still in my 1989 daze.....
                                        But I decided to post my Halloween tutorial anyway!
I love Halloween so much! Getting to use makeup I can't use on an everyday basis is so fun :)

This year I have decided to be a zombie. The makeup I am doing for this look is so easy to follow and I'm sure you guys will have fun with it too! 
Here's a little preview of the finished look: 


 Everything I used for this look I already had in my makeup collection so you shouldn't have to go out and buy anything new..... you'll just have to do a bit of brush scrubbing when you are finished!

To start off I moisturised my skin so the makeup would not dry out my skin too much. After that, I used my foundation and put on a normal base coat,  followed by powder. After I had my base coat on, I got a white eyeshadow and dusted it around my face using a blender brush. This helped my skin look paler than it normally would be.

To get the 'bruised' or 'rotting' spots on my face, I got an old bronzer brush and some black eyeshadow. All you have to do then is dab the eyeshadow onto the corners of your forehead until you get the colour desired. For the cheekbones, you apply the eyeshadow as if it was bronzer and drag the end of the line down your face.

After the bruises are done, move onto the eyes. For this you will need red and black eyeshadow, black liquid eyeliner and eyeshadow brushes. Apply the black under your eye and continue onto your lid. Messily blend the black all over your eyelid and use a blending brush to blend the eyeshadow further. Just under your brow bone and under your eye, apply some red eyeshadow using a different brush. Blend the two colours together and your eyes are done!


To get the black blood dripping from your eyes, you will need a black liquid eyeliner and a steady hand! Draw a line from your tear duct to the edge of your lid for both eyes (just like winged eyeliner but without the wing!). On the corner of each eyelid, extend the liner down your face in a jagged line. Draw random lines coming out of each line until you are satisfied with the look. On one of your eyes, do the same as the outside but draw this one from your tear duct. 


For the lips, line them with the same eyeliner and extend the bottom lip up slightly. On the extended line, draw two parallel lines downwards to make them look like stitches. After your lips are lined, get a red lipstick (or any other colour you think suits) and do your lips. I decided to dab more eyeliner on my lips and blend it in using an old concealer brush at the end - you do not have to do this if you don't want to but I love the look of it!


This look is so simple to achieve and I loved doing it.
What is everyone else dressing up as for Halloween? 
Do you think you'll be a zombie?
Let me know in the comments below!

xoxo,
Ciara.


Monday 27 October 2014

1989

Okay so.....

Today's post was going to be a Halloween makeup tutorial but I just bought 1989, Taylor Swift's new album so I got sidetracked... 
Instead of a Halloween makeup tutorial, I'm gonna do a post on Taylor's new album because it is flawless.

I had to trek all over Cork just to find the album - every single store I went to was sold out of the deluxe version (AHHHHHHHHHHH NO!) so I eventually settled for the normal version because I couldn't wait any longer!
The CD case comes in a box which has the exact same cover as the case. It's a polaroid of Taylor (well half of her face anyway)

Every album comes with thirteen polaroid pictures of Taylor with  lyrics printed on the bottom. There's a total of sixty-four polaroids out there and you can get 1-13, 14-26 and so on. I got #14 to #26 and mine range from black and white to blurred. I think the polaroids are a really nice touch because it makes the album seem a lot more personal.
There is thirteen tracks on the album. Just in case you are not a Taylor Swift fan, thirteen is her lucky number, hence the repetitive thirteens.
Here is the tracklist:
1. Welcome to New York
2. Blank Space
3. Style
4. Out Of The Woods
5. All You Had To Do Was Stay
6. Shake It Off
7. I Wish You Would
8. Bad Blood
9. Wildest Dreams
10. How You Get The Girl
11. This Love
12. I Know Places
13. Clean

I instantly fell in love with Style. It is an upbeat song written by Taylor, Max Martin, Shellback and Ali Payami. I won't even try do a track-by-track review because I would be here all night and it would go on for pages. 

Basically, in this album, Taylor waved goodbye to her country roots and officially broke into pop music. Each track tells a new story with a different beat. I have had the CD for three hours and it has been on repeat since I got into the car. I'm still listening to it now, all cozy in my bed because it's raining outside :(

Taylor, your fifth studio album will definitely be a hit. The music is easy to dance to and the lyrics are so catchy! The only thing that would make this music even better IS TO HEAR IT LIVE. PLEASE BRING THE TOUR TO IRELAND THIS TIME!

Love's a game, wanna play?

xoxo, 
Ciara.

Sunday 19 October 2014

#LushChristmas

Heya guys :)

So the lovely people at Lush invited me to their Christmas blogger/vlogger event last week. It was my first blogger event ever and I was pretty awkward hahaha. The whole evening was fabulous though, they had adorable little Christmas nibbles set out and the smells from all the products was just heavenly!

Here's a little OOTD because I loved it so much and I'm unhealthily obsessed with maroon at the moment! 


We got a little peak at the Christmas range for this year and let me tell you, it will not disappoint you at all! Some old favourites like Snow Fairy are back as well as a new favourite of mine, Yog Nog soap. Literally this soap is amazing. You might have seen Zoella's video where she actually licks the soap and trust me,  I really wanted to but I would not recommend licking soap at all :P For me, the soap smells like a caramel latte, it has such a smooth texture as well. If you're looking for a festive soap, I would definitely get some Yog Nog!

Another product I absolutely loved was First Snow dusting powder. It's new to the range this year so don't fret if you've never heard of it before! I heard it being described as it being like Elsa from Frozen had just walked past you and I couldn't agree more. All you have to do with this is lightly powder your skin wherever you want a little shimmer to reflect off the lights around you. It's perfect for Christmas parties or just for fun if you feel like it! First Snow shares the same fragrance as Celebrate body lotion and I found it smelt like the orange creme sweet in Roses, one of my favourite Christmas scents!

When we were leaving, we got a lovely little gift bag full of Christmas goodies that I'm so excited about. The bag everything came in is adorable and I can't wait to use it for Christmas shopping :) 


The first thing I got in my bag was the Golden Wonder giftbox. It's wrapped so beautifully I haven't had the heart to open it yet!
The box has 100g of Gold FUN and the Golden Wonder bath bomb. Both of these items are limited edition Christmas products. The gold fun is so amusing I love it so much!

This little guy is a gold lustre filled blob of fun. It has a play dough-like texture that is great for kids and you can make fun shapes like stars out of it! The scent is a sweet honey-like scent that I just love! You can use it for bath, body, hair or in the shower so it's a fabulous 4-in-1 product :)
The Golden Wonder bath bomb is the second product in the giftbox. This bath bomb is one of my favourites because there's a little surprise waiting when you put it into the bath! It is full of uplifting orange, lime and cognac oils with a scent that I can't help but say is just like a fruity drink or cocktail.
The second gift I got is the Jingle Bells gift box. The box is so festive! It is covered in little Christmas bells and the lid even has some bells on it so you can mess around with it after you've used all the bath bombs!
The first product in this box is the Golden Wonder bath bomb and I've already described what it is like above :) 
The second product in the box is  the mini Comforter bubble bar.
I love the Comforter,  the berry scent just relaxes me as soon as I smell it. All you do with this is crush a little bit of it (I use about half) under running water and get into a bubble filled bath full of fruity scents
A new Christmas product that I think is the cutest thing Lush has ever created is the Christmas Hedgehog bubble bar.
Look at how cute it is! The green prickly part of this little guy is made of shea and cocoa butters, you can literally feel how smooth it is. It is so moistourising for your skin and the smell is so inviting. The only word I can think of to describe the scent is Christmas but this little guy is just too cute not to get!

The Luxury Lush Pud path bomb looks like a mini disco ball! It is lavender scented which I love becuase I adore nice relaxing baths :) It will turn your bath a million different colours and I can't wait to try it out!

Another new addition to the Christmas line is the Drummers Drumming  bubble bar. I have had so much fun with it already because it is basically a hand-held drum. This strawberry scented bubble bar is good for at least three baths! All you have to to do is swish it around the water until you are satisfied with the results!
 
A returning favourite of mine is the  Magic Wand  bubble bar. You use it in the exact same way as the Drummers Drumming bubble bar except this time, your bath will be full of a delcious vanilla scent.

The 2014 gift guide (inspired by story telling, the city of gold and German techno nordic pop)...from stocking fillers to secret santa gifts and luxurious main pressies! All come in amazing, beautiful boxes and packaging.

Thank you to the team at Lush who invited me to their lovely event :)
#LushChristmas


This ia not a sponsored post.

Wednesday 1 October 2014

Wet N Wild Brow Kit Reveiw

Wet N Wild is an American drugstore beauty brand that launched in Ireland this year. I knew about the brand from watching American Youtubers and was so excited when I heard they were launching in Ireland!

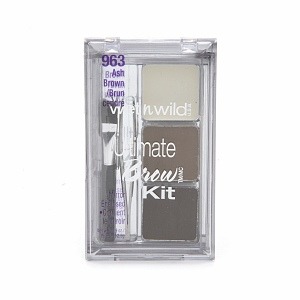
The product I was most excited to try out was the Brow Kit in Ash Brown. After hearing numerous raving reviews about the kit, I couldn't wait to try it for myself.


The kit contains a wax, two brow powders, a pair of tweezers,  an angled brush, and a mirror. The powders alone are phenomenal! The powders are really pigmented and the wax keeps all the hairs in place which is fab :)

I find the tweezers good for when you're on the go, they are quite small and hard to use with precision but if you have time on your hands, they work perfectly. The brush is quite the same. It's good but rather small. If you have another angled brush, I would definitely use it rather than wasting time using a brush that is tiny. However, if you don't want to invest in a full-sized angle brush, stick with the one in the kit!


 The kit comes in two colours, Ash Brown and Dark Brown. As I have light eyebrows I bought the ash brown kit and use the lighter of the two shades as it is as close to my natural eyebrow colour as it gets! 

 The Wet N Wild Brow Kit is available in selected Penneys and Dunnes Stores nationwide. The kit retails at a reasonable €3.99 which is very affordable and the quality is amazing for only €3.99!

                                               Have you tried the Wet N Wild Brow Kit?
                                                           Did you love it or hate it?
                          Do you have any recommendations on what brow kit I should use next?
                                                 Let me know in the comments below :)

xoxo,
          Ciara.